Thursday, May 31, 2012

Confession # 24: If your car doesn't come with one, make it yourself

Follow Me on Pinterest
Our new ride: A 2003 Subaru Legacy
A few weeks ago me, my daughter and my husband driving and a car didn't notice the light change and t-boned us. We were all alright, thank the Lord. But our 7 year old Hyundai Accent will never see the light of day again. Thus we found ourselves at countless dealerships and checking out Craiglist. We finally settled on a Subaru Legacy. We love it. But the only flaw is that the pocket behind the front seats is missing. Which is where I used to keep Liana's books (the only thing to keep her entertained on long car rides). So I turned to Pinterest for the answer...
2 Caddy's hard at work
The bigger Caddy
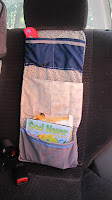
And this is what I came up with. I didn't really follow a pattern, I just looked at some photos of the following sites and eyeballed it. I used all scrap material I had lying around, my friends old shoe laces for the ties, and bias tape I picked up at a church yard sale last summer.
Cost: 0.0 dollars. Time it took to make both: 2 hours. Totally worth it. Hope this inspires you to sew today.
All you need, plus a few shoe laces
The smaller caddy
Measurements:
Large caddy:
2 @ 18 x 23
2 @ 18 x 8 1/2 (I used two different patterns)
1 @ 18 x 6 1/2 (top pocket)

Small caddy:
2 @ 11 x 23
2 @ 11 x 8 1/2 (I used two different patterns)
1 @ 11 x 6 1/2 (top pocket)


I added bias tape to most of the pockets, but you can do whatever you like to make it have a clean edge. Then I sewed them onto one of the 18x23 or 11x23 (depending on the size caddy you are doing) and sewed the pocket stitches. Wherever you want them. With the big caddy, I made the bottom pocket have 2 pockets, the middle one have 3 and the top one have 4. With the smaller caddy, I left the bottom two pockets alone and split the top on into two pockets. You can do whatever you want here. Then I sawed on the ties (shoe laces) on the top and the sides. Last step was sewing the whole thing onto the back of the remanding 11x23 or 18x23 piece. Pull it inside out, sew the whole and you are done. Look at these awesome sites for a WAY better step by step instruction! This one looked awesome but required items I did not have: Cool Car Caddy. This one was a good idea, but just needed more color: The Car Organizer. I looked at Four Pocket Organizer  for a visual. This one was cute: Car Organizer. All and all, I am pretty happy on how mine turned out. I hope Liana enjoys them too.
Finished!


Tuesday, May 29, 2012

These Are A Few Of My Favorite Things: May's 10

Follow Me on Pinterest
Ripe Green Ideas
1. Tire Toy by Ripe Green Ideas
This is too cute not to re post. It is a tire, cut in half, screwed onto a board and painted. It seems like it would be pretty easy and really cute!


Crafters Hours
2. Old T-shirt to Tank by Crafters Hours
This totally gives a new life to that old t-shirt you have lying in your closet but never wear.


Jonah Lisa Dyer
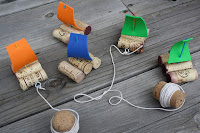
3. Cork Boats by Jonah Lisa Dyer
I have tons of corks and am always looking for a way to make them into something fun. Here is a great idea to turn them into little boats for the kids. I also did this snake idea recently for a MOPets craft: Cork Snake by Sophie's World


Obsessively Stitching
4. Hula Hoop Tent by Obsessively Stitching
This is an awesome idea. I have been trying to get my hands on some hula hoops for a while now. Now I have another reason why I really want them! This uses an old sheet and 5 old hula hoops. Awesome!


Everything Your Mama
Made and More
5. Jean Apron by Everything Your Mama Made and More
What a cute idea to turn an old pair of jeans into an awesome apron for your little one.


Kinerpendent
6. Scrabble Magnets by Kinderpendent
I have tons of scrabble tiles in my craft closet, just waiting for a fun idea. This is a great idea for them. I think I might need to wait a bit until my daughter is older and is out of her "eating everything in site" phase.


Lidmen
7. Soda Lid Doll by Lidmen
Step by step instructions (with great photos) on how to make this cute Lidman using old soda caps. What a great recycled toy.


Domestic Candy
8. Tie Snake by Domestic Candy
This is a great use for all those old ugly ties your grandpa insist your husband takes but your husband would never be caught dead in. The snake doesn't care if it has an ugly pattern or not.


Creativity in Progress
9. Egg tea Cups by Creativity in Progress
What a fun way to use all those otherwise useless plastic eggs from Easter.


Dornob
10. Upcycled t-shirt ideas by Dornob
This website has some really cute ideas for making old t-shirts cute again. I love this one at the top pictured here. But all her ideas are cute.


I love upcycling and recycling. There is a curtain thrill in it. I hope that these inspire you to find something new out of something old. And remember, no shoes required.


Thursday, May 3, 2012

Confession # 23: Flowers come in cans

Follow Me on Pinterest
I have bags and bags of tin cans and I finally decided that I needed to do something with them. So here is what I came up with:

Tin Can Flower Container


What you will need:
-6 tin cans (cleaned and labels removed)
-A six pack of flowers
-Potting soil
-A cup or so of small rocks (I just looked around my yard for them)
-2-3 pages of 12 x 12 scrapbook paper


Step 1: Cut a piece of paper to fit over the can.

Step 2: Glue the paper around the can. I used a glue done and it's been four days and the paper is still staying.


Step 3: Mod Podge if you so feel. I didn't :)

Step 4: Toss some rocks at the bottom on the can, drop in a couple scoops of dirt, place flower  in the can, fill dirt around plant.

Step 5: Enjoy!

Note: This plant will not last forever in this pot. The can will start to rust after a while. But it will be really cute for a couple of weeks. Make sure you place something under it so when it does rust, it wont stain whatever is underneath it.
Happy Barefoot crafting!

Tuesday, May 1, 2012

Vanessa's IT List: Beautiful Busy Bags!

Follow Me on Pinterest
Remember how I talked about my busy bag group I joined? (well if you missed it: click here)
I have been receiving tons of busy bags and wanted to share their awesomeness with you. So without further ado, here are some (but not all) of the amazing busy bags that I have either exchanged or received.

Chalkboards
1. Chalk Roll Up

I found some chalk fabric from my local fabric store and wanted to make place mats with them. Which is still might. But for now, I made these for my first busy bag exchange. Liana loved using it on our airplane trip when we went to the Dominican Republic. I did mine free hand but this pattern by Maggie Muggins Designs puts mine to shame: Chalkboard Roll

2. Popsicle Puzzles
Waiting for them to dry...
I saw this idea on pinterest and couldn't wait to try it. I wanted to use real animals so that they could not only have fun putting the puzzles together but also learn their animals along the way. I gave each person in my group a set of four. The only thing that I would mention is that you need to let it dry for at least 2 days and do one of the following:
a. paint a clear coat of acrylic over the top of each puzzle piece
b. dust each piece with baby powder
c. (if mailing it) place a piece of plastic in between each piece.
This will help it from sticking together.  Popsicle Puzzles by Motherhood on a Dime

photo by Beth Eckert
3. Mini Felt Board by Beth Eckert

I love this idea because Liana can play with it in the car. She took a small piece of cardboard and glue felt onto it. Then cut out pieces to make this cute scene.


Photo by Sarah Hull
4. Felt Heads by Sarah Hull
My daughter loves this one because she has just started to learn her body parts.


Photo by Lina McAndrew
5. Habitats by Lina McAndrew

She made a little book for every kid. The habitats were made of all felt and so were the animals. The kids can match the animal to their habitat. Here's a link to give you some more ideas on how to make habitats: Habitat Houses


photo by Willa Gray

6. Magnetic Discovery Bottles by Willa Gray

These are fun music makers too. Will entertain your little one for hours. You can put whatever you want in them. Place some small magnets in there and anything that are actracted to magnets.


Photo by Jill Rucker
7. Pom Pom Push by Jill Rucker
This is a great fine motor skill activity. Just cut a hole at the top of a box and get some pom poms and you are good to go!


8. Color Sorting Sheets by Karen Muskell
Laminated colored paper and different colored objects. You can use whatever you have around the house. My daughter enjoyed watching me tell her the colors and help her sort them.


Photo by Lina McAndrew
9. The Very Hungry Caterpillar by Lina McAndrew
This is great. All the food is made of felt and can be taken off the ribbon (Caterpillar). So that while your kid reads the book, they can actually have the caterpillar eat the food.


Photo by Paul Michell-Bentley

10. Popsicle color sticks by Paul Michell-Bentley
The felt popsicle comes off and your child can match the words with the color. These are so cute. Liana likes to pretend to eat them. You can take felt and sew the popsicle top and either dye the stick or label it. Either way, they will enjoy it!


There are so many more where that came from. Maybe I will post some again soon. But right now I am busy kicking off my shoes and making more busy bags. I hope this inspires you to go out and either join our group or make some of your own. Happy May Day!